Tuesday, December 17, 2013

TREES OF CHRISTMAS

Hello Ruby Rock-it friends!  Today we are continuing the Ruby Rock-it 12 Days of Christmas!
 
I have created two projects using 12 Days of Christmas and Joyeux Noel.  I love creating projects for Christmas, and these two paper ranges offer wonderful  contrasts in color and design!
 
My first project to share is a canvas focusing on 3 colorful Christmas trees.  This was fun to do, and I enjoyed piecing the lovely papers for the trees.  I used the Tsukineko Memento Dye Ink.  I also used one of the Epiphany Crafts Bubble Caps and Frame.
 
 
My second project is a card using the gold and white papers and embellishments in Joyeux Noel.  I used an embossed imprint card from Fundamentals, and inked it with gold dye ink.  
 
 
Try making some of your own home décor and cards using these wonderful paper ranges.  I wish you Happy Holidays, and lots of new projects and ideas in 2014!!
 
Supplies:
Christmas Cheer Trim
 
 Joyeux Noel Paper Pack
 
Fundamentals  - Embossed Cards - Flourish
 
 
Epiphany Crafts


Saturday, December 7, 2013

RUBY ROCK-IT BLOG HOP!

Hello Ruby Rock-it Fans!  This month, with the holidays upon us, we are featuring our beautiful Ruby Rock-it 25 Days of Christmas and Joyeux Noel ranges!  We're especially excited about our Blog Hop because we have all been creating projects using our Christmas ranges!  We hope you get some ideas and inspiration as you hop along!

Here's the order of our hop, in case you get lost along the way:


To be eligible for our fabulous prize, make sure you leave a comment on each designer's blog and then on the Ruby Rock-it blog once you're done hopping along the Ruby Rock-it trail!
 
 
Comments must be posted by Wednesday, December 11th at 11:59 PM PST.  We will announce the winner on our Ruby Rock-it Blog the week of December 15tkh.  Ok, on your mark, get Set ... GO!!
 
I'm delighted to share my project for the blog hop with you!  Using the 25 Days of Christmas range, I created a Christmas Tree Shadow Box.  I used the Christmas latticework paper as a background, with some flower chipboards for dimension.  The tree is centered on a background of paper and sheet music, then attached to an acrylic sheet.  The last layer is the red and white chipboard frame.  I added some velvet ribbon and lace behind the tree, and used some red cord on the outside of the shadow box itself!  Then, I carefully layered each part into the box without the last piece of glass - I wanted the tree to stand out beyond the frame!


I enjoyed working with these beautiful papers, and placing the shadow box on a wooden stand creates a Christmas accent to any room!  Try using paper and embellishments to make your own Christmas decorations!
 
Supplies:


Tuesday, December 3, 2013

ADVENT CALENDAR FOR KIDS

Hello Ruby Rock-it friends!  Linda here to share a fun candy cane Advent Calendar - just for kids!  I used the delightful 25 Days of Christmas Paper Pack for this project.  Somehow the traditional bright red and  green Christmas colors get me in the mood for this lovely holiday!


I used a 12 x 16 canvas, sealed it with gesso, then inked the edges with Tsukineko Memento Gamma Green, then used papers from the Christmas Paper Pack as background.  I found some tiny little envelopes, then cut and glued the 25 days of Christmas pieces to the front.  I put a small wrapped candy in each one, and finished it with a small candy cane.  This was easy and fun!  Enjoy creating your own Advent Calendar with the wonderful Christmas papers from Ruby Rock-it!
 
Supplies:
 
 
http://www.rubyrock-it.com/product/931227102743525 Days of Christmas Layered Accents


Thursday, November 7, 2013

AUTUMN PEACE

 
Hello Ruby Rock-it Fans!  Welcome to our blog hop - we are happily creating things for the upcoming holidays!  We are giving an awesome prize to one of our fans, so be sure to follow along and leave a comment along the way to be eligible to win.
 
  Come along with us on our blog hop -- our designers have been busy creating some great projects to inspire you!
 
Here's our order in case you get lost along the way:


Here's a photo of our prize:


Make sure you leave  a comment on each designer's blog and then on the Ruby Rock-it blog once you're done.
 
Now come hopping with us along the Ruby-Rock-it Trail!

If you arrived from Linda Auclair, you're in the right place!


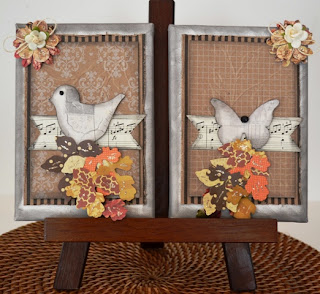
Birds and butterflies are as much a part of our beautiful autumn seasons as the gorgeous fall colors!  I am sharing with you today two canvases I created to reflect this idea!  I used gesso to seal the canvases, then used Pumice Stone Distress inks on the sides, the edges, and most of the paper pieces..  The Bella! Kinda Krafty papers were perfect for the backgrounds!  The leaves are from a Spellbinder die cut, and I used all the papers in the Bella! Family Inspiration Kit for the leaves.  I finished the two canvases with Platinum Stickles to highlight!
 
I hope you will be inspired to create your own projects on  canvases.  They provide fun and easy opportunities to create projects with lots of dimension and depth!

Now visit the fabulous blog of Pattie Beltran!
 
Supplies:


Monday, October 7, 2013

RUBY ROCK-IT BLOG HOP

Hello Ruby Rock-it fans!  Welcome to our blog hop!  We are having fun celebrating all things Fall and Halloween!
 
We are giving away this awesome prize to one of our lucky fans.  Be sure to follow along and leave comments as you go to be eligible to win the prize!


Come and enjoy the hop with us - we've been working hard to inspire you with Ruby Rock-it Kinda Krafty paperz and our Bella! Family range  and embellishments!
 
Here's our order in case you get lost along the way:


Make sure you leave a comment on each designer's blog, and then on the Ruby Rock-it Blog once you're finished hopping the Ruby Rock-it trail!

If you arrived here from Linda Auclair, you're where you should be!
 
In keeping with the family and fall theme, I created a layout using a photo of my son and his family.  I love all the gorgeous colors, wonderful scents and perfect days of fall.  On this layout page I've used Ruby Rock-it Bella! beautiful fall flowers and backgrounds.  We swapped with Art Anthology in September, and I've used one of their Dimensional crystal paints and one of their Sorbet Dimensional paints!
 
 
I also fussy cut some of the flowers and foam dotted them for dimension on my page.
 
 
Supplies:


To enter to win, leave a comment on each blog, then on the Ruby Rock-it Blog.  Comments must be posted by Friday, October 11th at 11:59 PM PST to be eligible for the random drawing.  We will announce the winner the week of October 14th.
 
HAPPY HOPPING!
 
Your next stop along the Ruby Rock-it trail is to Pamela Young's awesome blog!


Wednesday, September 18, 2013

FUN WITH SCHOOL PICTURES

 
Hello Ruby Rock-it fans!  Linda Kretz here to share a mini album designed to keep treasured school year pictures for the "littles" in your family!  As you know, we at Ruby Rock-it are featuring the fabulous, colorful Bella Boutiques Inspiration Kit and embellishments designed to complement the papers. It's always fun  to get back to the basic love of all scrappers- paper! 


This is a mini album from Maya Roads, and it was a delight to delightful to fill it up with pages that have room for those special  school pictures.  The book is covered with paper from the Inspiration Kit.  I cut circles and word from the kit to fit the school theme.
 
I've included the 5 double-sided pages to share with you some of the fun ways to use chipboard pieces, words, and occasional ribbons or buttons to enhance the space for pictures! 


Enjoy working with these lovely papers - anything you create will be beautiful!
 
Supplies:


Thanks for stopping by!


Tuesday, September 17, 2013

FIRST DAY OF PRESCHOOL!

 
Hello everyone!  Linda Kretz here to share with you a sweet layout of my granddaughter, Makenzie, on her first day of Preschool.  She is 4 and so excited to be a "big girl" going to school!  Of course, her mom and grandma had mixed emotions!  The Bella Boutique Inspiration Kit and School Days from Ruby Rock-it ranges were so perfect for this project- so bright and fun.


I drew and cut out the large apple as a background for the picture, and layered pieces of paper, some lace and twine to provide color and dimension.  The strips of words and letters were great because she was learning to write her name during that first day!   
 
Here is a close-up of the picture and paper embelishments
 
.
This was a fun project, and it brought back the additional pleasure for scrappers to just play with paper!  I hope you enjoyed this, and try using these papers to create with your kids some special school memories!

Supplies:

Bella School Days Inspiration Kit

Bella Boutique School Days - Word to Go

Bella Boutique School Days - Shapes to Got


Saturday, September 7, 2013

MY STUFF SUPPLY BOX

 
Hello Ruby Rock-it fans! 
 
Welcome to our September blog hop. This month we are featuring our fun, fabulous range for this time of year, Bella Boutique School Days!  As you hop along, make sure you get the details on how you can have a chance to wind the amazing RRFB pack!
 
 
Come and hop along wiuth us, leaving comments at each blog to enter to win!  Your could win your very own collection of Ruby Rock-it goodies!  Here's the order of blogs in case you get lost along the way~


Linda Kretz - (you are here)


Make sure you leave a comment on each designer's blog, and then the Ruby-Rock-it blog once you're done hopping along the Ruby Rock-it trail.
 
Comments must be posted by Tuesday, September 10 th at 11:59 p.m. PST to be eligible for the random drawing.  We will announce the winner on our Ruby Rock-it blog on Friday, September 11th.
 
Enjoy the hop!
 
If you arrived here from Linda Auclair, you're in the right place.
 
The project I am sharing with you today is a supply box to hold school supplies: ruler, pens, pencils, tape runner, scissors, post-its, stapler, etc.  The Bella Boutique School Days range is so colorful and fun to create all kinds of school projects!
 
 
I found a box at Michael's, but it was pink!  So I painted to entire box with red acrylic paint, then covered all exterior and interior sides with the wonderful papers in this range.  I used some of the Bella cardboard die cuts and word strips to make it fun and colorful as a desk top supply box.  I covered the bottom with felt to avoid scratches on furniture.  The red & black clothespins can be removed for a student to post other items.
 
 
Here's a side view to show the separate parts of the box.  My project received an enthusiastic approval from my grandson, Austin., who is in middle school.  You can't ask for a better accolade than that!  Please enjoy the wonderful work of our design team as you hop along, and leave comments for your chance to win the awesome prize!
 
 Supplies:


Your next hop along the trail is Pamela Young's blog.


Monday, September 2, 2013

BULLETIN BOARD FOR KIDS

Hello Ruby Rock-it friends!  Linda Kretz here to share with you a bulletin board I created for my grandson, Austin, who is in middle school.  We at Ruby Rock-it are featuring the wonderful, colorful Bella Paper Ranges and embellishments that are perfect for kids! 
 
My project is a simple bulletin board that kids can either create for themselves, or a project you can share in creating with them!
 
 
I found an inexpensive corkboard bulletin board and decided the idea was great for the fabulous primary colors used in these ranges!  I chose four of the papers, and cut them to fit the board, which measures 23 X 17 inches.  I used small strips of the black and white polka dot paper to separate the sections.  I trimmed the edges with black rick rack and black and white straws  - lots of fun for kids to decorate with.!
 
 
This was a piece of red chalkboard paper with gold writing - so perfect for the back to school theme.  I used some of the white ruled paper; trimmed with black, and used some of the Bella Cardboard Stickers with school icons, and Papers Notes.  This collection has so many fun pieces for kids to use!
 
 
I enjoyed the bright colors and wording used on this paper.  I chose some strips from some of the other papers and created an award ribbon for a "Star Student".
I hope you have enjoyed this bulletin board, and will love working with these Bella school ranges as much as I have!  It was simple, fun, and so colorful!
 
Supplies:


Many thanks for joining Ruby Rock-it today.  Try this Bella Inspiration Kit and see how much fun you can have with your kids and the delightful projects you can create together!


Wednesday, August 21, 2013

Thinking of You Today

Hi Ruby Rock-it fans.  Linda Kretz here to share a project I created for a special friend of mine.  She's been going through some tough times lately, and I'm hoping my basket will cheer up and let her know I've been thinking about her.  Our focus this month has been to explore some new and delightful ways we can create using our new wedding ranges!
 
 
I decided to put some blooming flowers in the basket (she loves flowers and anything pink!)  I made a little card to go with it that says "I'm Thinking of You Today".  With a separate card, she can then use the basket for little trinkets or special occasions of her own.
 
 
.  I love baskets because they can be used for so many things!  I love the new paper ranges from Ruby Rock-it - they lend themselves so well to lots of  happy projects!
 
Thanks for stopping by and making Ruby Rock-it part of your creative day!
 
My Supplies:


http://www.rubyrock-it.com/product/9312271032200

Saturday, August 17, 2013

Ruby Rock-it & Scrap FX Blog Hop

 
Hello everyone!  Linda Kretz here, welcoming you to a very fun and creative two-day blog hop as the designers from Ruby Rock-it join the designers from Scrap FX with some great ideas and inspiration!


Each day there will be 11-12 blogs to visit, using our gorgeous products from both companies. If you lose your way hopping along, you can go back to the beginning at Scrap FX.  Prizes include the following:
From Ruby Rock- A complete set of the beautiful At Last range


 From Scrap FX:


 Visit each participating designer's blog each day and leave a comment. (Make sure you include your email address so we can contact you if you win.
 
For additional chances to win: 1) become a follower here at Ruby Rock-it, 2) LIKE us on Facebook and leave a message you came from the blog hop.
 
The deadline to leave comments for prizes is 11:00pm, EST, Monday Aug. 19th.  Winners will be announced on both blogs Aug. 20th. 
 
Here are today's participating designers:
 
Linda Kretz (you are here)
 
 
  Today I am sharing with you a layout using a photo of my niece and her family as they happily vacation at the beaches of Tulum, Baja California.  I loved using the rich browns of Ruby Rock-it's Kinda Krafty paperz and the Scrap FX laser cut chipboard pieces to bring forth the beautiful colors of the picture!


I used a We R Memory Keepers punch on the 2nd paper and stamped some  some reeds in white to partially show around he edges.  It is foam dotted to the striped background paper. The Scrap FX flourish, title and twisted branches add focus to the picture.
 
 
My supplies:
Scrap FX chipboard
 
I hope you are enjoying the blog hop and have found some new ideas and inspiration to spur your own creativity!  Don't forget to leave a comment at each blog along the way to have a chance to win one of the wonderful prizes from Ruby Rock-it and Scrap FX!
 
Your next stop in the blog hop will be with the awesome Misty Russell.


A

Wednesday, July 17, 2013

Weddings and Romance with Ruby Rock-It

 
Hello Ruby Rock-It fans!  This is Linda Kretz  with a wedding layout using the beautiful new summer release papers from Ruby Rock-It  Weddings are special events for everyone, especially because they focus on new beginnings and memorable moments in time.  My layout is memorializing that moment for my daughter, Holly, and her wedding 17 years ago at the Rose Garden in Oakland, California.


I chose these wonderful black and silver papers as background for my black and white photo, with pink accents for color and contrast.  The black, silver and pink die cuts around the picture lend focus,  and the other touches of bling, decoupage flowers, antique pink lace. and pearlized hearts are accents to pull the layout together.  I added pink and white tulle to emphasize the lovely flowers. 
 
I hope you will experiment with the awesome Ruby Rock-It summer release papers to create romantic memories of your own!
 
Supplies: (Ruby Rock-It)
 
Bella My Romance Paperz
Bella Betrothed Paperz
Bella Celebrate Paperz
Fundamentals Cardmaking Pack
Fundamentals Decoupage Pack
Bella Heart Stickers
Bella Die-cut Borders


Thursday, July 11, 2013

Hello everyone, Linda Kretz here to share a tutorial with you.  I'm going to show you how to make vellum roses to embellish your creative projects.
 
Supplies needed:
Embossing pad
Glue Gun
Stylus
2 paint brushes (different sizes)
5 petal flower punch

Tuesday, July 9, 2013

RUBY ROCK-IT & THE TWINERY BLOG HOP

Hello and welcome to the Ruby Rock-it & The Twinery Blog Hop.  We are so excited to be partnering with this amazing company this month! 


The Blog Hop dates are July 8th and 9th, and there will be gorgeous prizes from both companies.   The Twinery is providing a Solid Color Baker's Twine Sampler.
 
 
Ruby Rock-it is providing the Carnival King Kit
 
 
To be eligible for prizes, folks need to visit each blog on the hop and leave a comment.  You will have 5 days to do so.
 
If you have arrived here from Tifany deGough  you are in the right place!  If not, please return to the beginning of the blog hop.
 
I had lots of fun creating this burlap wall hanging, using products from both Ruby Rock-it and The Twinery.  The combination of paper, embellishments and Baker's Twine made a perfect July scene!  I wrapped twine around each balloon and around the background of the burlap, embossed the Carnival King pager, chose cardstock embellishments from the same range, added some ribbon, and foam dotted the pieces for dimension!  I hope you like my project and got some ideas for your own creations!


Remember to leave a comment on each blog to be eligible for great prizes.  Please include your email in your comments to help us reach you if you win/1
 
Now it is time to hop along to visit Sarah Andreotti  for another awesome project.  Thanks for joining us for our blog hop!


Thursday, July 4, 2013

So Much Fun

Hi everyone!  I am truly honored and excited to be one of the new Design Team members for Ruby Rock-it!  My first project is a wall hanging featuring Hannah, my granddaughter, and her face painting at a local carnival.  She is a sweetheart, and is obviously delighted with the result !
 
 
I love the papers and embellishments from Ruby Rock-it and the Bella Embossed Cardstock for the background, which I highlighted with white ink.  I used the Framed cardstock for the carnival laundry line, and the Garlands for the bottom accent.  A piece of acrylic created a small window for the bottom focus. I had a lot of fun playing with this wonderful paper range.  I hope you enjoy it as well!


Monday, May 13, 2013

Hi everyone!  I'm adding some creations that I haven't posted to my blog to date!  Most cards, projects and layouts were designed using My Little Shoebox papers, letters, and cardstock stickers.  However, as you know, Helen Chu, the owner and designer of My Little Shoebox is no longer doing scrapbooking products.  I loved working with her, and thoroughly enjoyed her delightful, whimsical colletions!


Using some corrugated cardboard from Punky Sprouts, I created a  shadow box with My Little Shoebox papers, white acrylic paint, some Iridescent Medium, Starbucks stirring sticks, flower soft, and some ribbon and lace. 
 
 
This was just a fun card using kraft cardstock, embossing a tree background, foam dotting some cardboard sticker trees, and adding twine.
 
 
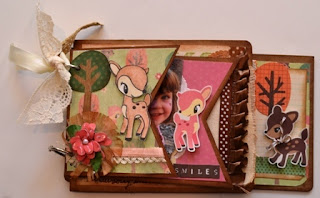
I love working with Punky Sprouts albums!  This one has such a variety of pages- such fun to experiment with placement and content!  (I've included the different pages to show what I mean)


I created this album for my grandchildren, and they love looking at it each time they come for a visit!